Create beautiful Excel using exceljs (Node.js) on IBM i
 In this article, we will see how to create advanced Excel sheets on the IBM i using exceljs/Node.js.
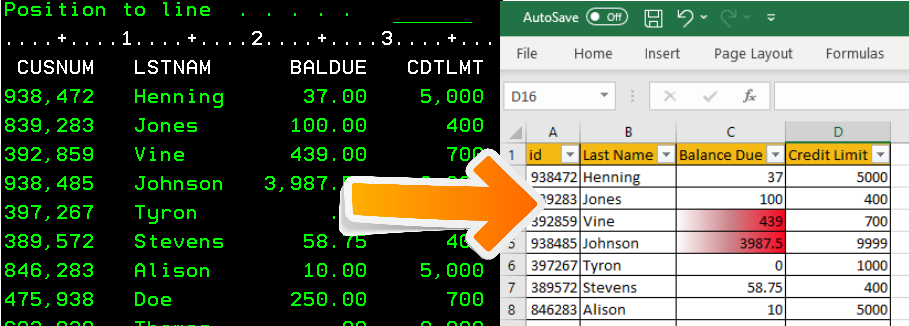
We know how to create a simple extract of database files, we know how we can download a physical file using the ACS (Client Access) tool. But how about automating the extract of information needed by the user and provide a beautiful ready to use Excel extract?
Many users request raw data in Excel or CSV format and then slice and dice it for higher management consumption; they spend a lot of time doing that. If we can provide them with the final version of their desired extract, I am sure the users will be happy with us in the IT department. I like to see a satisfied end-user.
Let’s see how to extract data in Excel, and add some simple formatting and some conditional formatting?
Note: The code for this utility can be downloaded from here.
How to generate a simple Excel sheet
Let’s begin with creating a simple Excel worksheet using a Node.js application. We will use the default table available on the IBM i - QIWS/QCUSTCDT.
We are using two Node.js libraries.
- idb-pconnector - For connecting to DB2 and extracting data
- exceljs - For creating Excel files
Kindly refer to my earlier article on the initial steps needed to initialize a Node.js application. Here I am giving high-level steps. These commands need to be invoked using an SSH session or CALL QP2TERM session on the IBM i.
- Create a directory for the application in IFS, under your home/UserID directory
mkdir ibmi-excel. - Change the current directory to the above directory
cd ibmi-excel. - Initialize the Node.js application using the
npm initcommand, which will generate apackage.jsonfile. - Install both the libraries using
npm install idb-pconnector exceljs, this will generatepackage-lock.jsonfile.
After the libraries are installed, let’s start writing our code to generate a simple Excel sheet.
Here is the code that will do the job for us, comments are included in it.
const { Connection, Statement, } = require('idb-pconnector');
const Excel = require('exceljs');

async function generateExcel() {
    // Create connection with DB2
    const connection = new Connection({ url: '*LOCAL' });
    const statement = new Statement(connection);
    const sql = 'SELECT CUSNUM, LSTNAM, BALDUE, CDTLMT FROM QIWS.QCUSTCDT'

    // Execute the statement to fetch data in results
    const results = await statement.exec(sql);

    // Create Excel workbook and worksheet
    const workbook = new Excel.Workbook();
    const worksheet = workbook.addWorksheet('Customers');

    // Define columns in the worksheet, these columns are identified using a key.
    worksheet.columns = [
        { header: 'Id', key: 'CUSNUM', width: 10 },
        { header: 'Last Name', key: 'LSTNAM', width: 10 },
        { header: 'Balance Due', key: 'BALDUE', width: 11 },
        { header: 'Credit Limit', key: 'CDTLMT', width: 10 }
    ]

    // Add rows from database to worksheet
    for (const row of results) {
        worksheet.addRow(row);
    }

    // Finally save the worksheet into the folder from where we are running the code.
    await workbook.xlsx.writeFile('SimpleCust.xlsx');
}

generateExcel().catch((error) => {
    console.error(error);
});
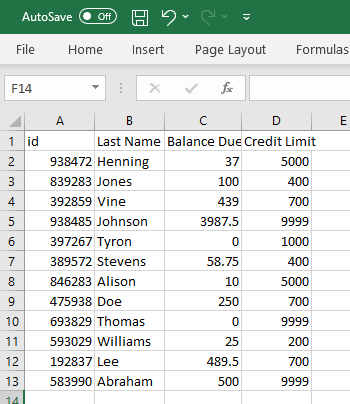
This program will generate a simple Excel like the below.

As you can see, this is a very raw format; let us start enhancing this Excel. The code to connect to the database and extracting the Results array remains the same. We will see Excel specific code below.
How to add some level of formatting to the Excel
How about adding a filter to the header row? A one-line code as given below does that.
// Add autofilter on each column
    worksheet.autoFilter = 'A1:D1';
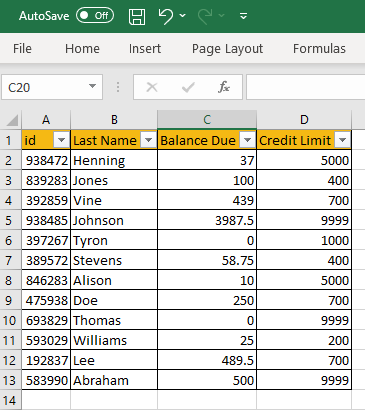
What if I want to have a background color for the header row and borders for all the cells? Sure, see below.
.......
// Add rows from database to worksheet
    for (const row of results) {
        worksheet.addRow(row);
    }
    // Add autofilter on each column
    worksheet.autoFilter = 'A1:D1';

// Process each row for beautification
    worksheet.eachRow(function (row, rowNumber) {

        row.eachCell((cell, colNumber) => {
            if (rowNumber == 1) {
                // First set the background of header row
                cell.fill = {
                    type: 'pattern',
                    pattern: 'solid',
                    fgColor: { argb: 'f5b914' }
                }
            }
            // Set border of each cell
            cell.border = {
                top: { style: 'thin' },
                left: { style: 'thin' },
                bottom: { style: 'thin' },
                right: { style: 'thin' }
            };
        })
        //Commit the changed row to the stream
        row.commit();
    });
...........
We get the below spreadsheet once we run the above code. Much better. Isn’t it?

How to add conditional formatting
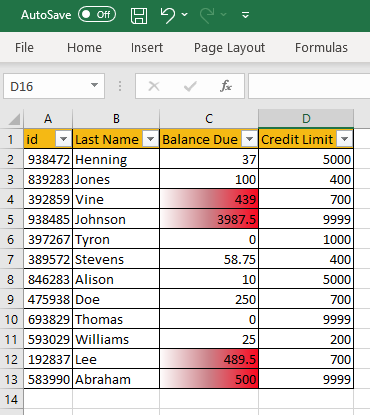
How about adding some conditional formatting? Let’s say the user wants Balance Due highlighted if it is 400 or more. Let us see how we can accommodate this request.
.........
row.commit();
    });

    //Process each column for conditioning
    const balDue = worksheet.getColumn('BALDUE')
    // iterate over all current cells in this column
    balDue.eachCell((cell, rowNumber) => {
        // If the balance due is 400 or more, highlight it with gradient color
        if (cell.value >= 400) {
            cell.fill = {
                type: 'gradient',
                gradient: 'angle',
                degree: 0,
                stops: [
                    { position: 0, color: { argb: 'ffffff' } },
                    { position: 0.5, color: { argb: 'cc8188' } },
                    { position: 1, color: { argb: 'fa071e' } }
                ]
            };
        }
    });
......
With the above code, we get our final beautiful Excel. We can further enhance it by adding calculations, tables, etc.

The complete code is as below.
const { Connection, Statement, } = require('idb-pconnector');
const Excel = require('exceljs');

async function generateExcel() {
    // Create connection with DB2
    const connection = new Connection({ url: '*LOCAL' });
    const statement = new Statement(connection);
    const sql = 'SELECT CUSNUM, LSTNAM, BALDUE, CDTLMT FROM QIWS.QCUSTCDT'

    // Execute the statement to fetch data in results
    const results = await statement.exec(sql);

    // Create Excel workbook and worksheet
    const workbook = new Excel.Workbook();
    const worksheet = workbook.addWorksheet('Customers');

    // Define columns in the worksheet, these columns are identified using a key.
    worksheet.columns = [
        { header: 'id', key: 'CUSNUM', width: 10 },
        { header: 'Last Name', key: 'LSTNAM', width: 10 },
        { header: 'Balance Due', key: 'BALDUE', width: 11 },
        { header: 'Credit Limit', key: 'CDTLMT', width: 10 }
    ];

    // Add rows from database to worksheet
    for (const row of results) {
        worksheet.addRow(row);
    }

    // Add auto-filter on each column
    worksheet.autoFilter = 'A1:D1';

    // Process each row for calculations and beautification
    worksheet.eachRow((row, rowNumber) => {

        row.eachCell((cell, colNumber) => {
            if (rowNumber == 1) {
                // First set the background of header row
                cell.fill = {
                    type: 'pattern',
                    pattern: 'solid',
                    fgColor: { argb: 'f5b914' }
                };
            };
            // Set border of each cell
            cell.border = {
                top: { style: 'thin' },
                left: { style: 'thin' },
                bottom: { style: 'thin' },
                right: { style: 'thin' }
            };
        })
        //Commit the changed row to the stream
        row.commit();
    });

    //Process 'Balance Due' column for conditioning
    const balDue = worksheet.getColumn('BALDUE')
    // Iterate over all current cells in this column
    balDue.eachCell((cell, rowNumber) => {
        // If the balance due is 400 or more, highlight it with gradient color
        if (cell.value >= 400) {
            cell.fill = {
                type: 'gradient',
                gradient: 'angle',
                degree: 0,
                stops: [
                    { position: 0, color: { argb: 'ffffff' } },
                    { position: 0.5, color: { argb: 'cc8188' } },
                    { position: 1, color: { argb: 'fa071e' } }
                ]
            };
        };
    });

    // Write the final Excel file in the folder from where we are running the code.
    await workbook.xlsx.writeFile('Customers.xlsx');
}

// Call the generateExcel function
generateExcel().catch((error) => {
    console.error(error);
});
How to install and run this utility?
Here are the steps on how you can install this utility and test it.
- Download the application folder on your Laptop/PC.
- Create a folder in IFS
mkdir ibmi-excel - Upload all the files using the ACS IFS upload option. (Or directly clone it if you have git on IBM i)
- Login to SSH session or from the green screen command line
CALL QP2TERM - Change your current directory to the above folder
cd ibmi-excel - Install the dependencies by running the command
npm install - Once the libraries are installed, call the utility with command
node final.js - You should have the
Customers.xlsxfile ready upon a successful run of the program.
Further Reading
Special Thanks
- PUB400.COM - Such a fantastic server to try out new things on the IBM i.
- Papaya.io - Web-based image editing tool, very easy and fast to edit images.
Conclusion:
With the open-source languages available on the IBM i, the possibilities of creating beautiful content for the end-users are endless. With little effort, we can deliver the latest output whether it be a web screen, reports formatted in PDF or simple data extracts like the above.
Hope this showcased how easy it is to build an extract with Node.js.
As always, request you to get in touch with me on LinkedIn/Twitter or email with your valuable feedback. Thanks for reading!
