How to use Visual Studio Code while working on IBM i
In this article, let’s see how we can use the Visual Studio Code (VS Code) while working on IBM i. This versatile editor is used for writing programs with languages like Java, JavaScript, Python, and many more, but how we can leverage it for writing RPGLE, SQLRPGLE, CLLE code is also important.
In recent months VS Code has emerged as the most preferred code editor in the programming fraternity. It is an open-source, free, lightweight code editor from Microsoft. This editor has tons of extensions, themes, customization, and powerful language editing features.
This article also covers the extensions, themes, and settings needed for the program to be written directly on the IBM i system, for its final compilation/deployment.
Note: The code for this article can be downloaded from here.
How to install VS Code
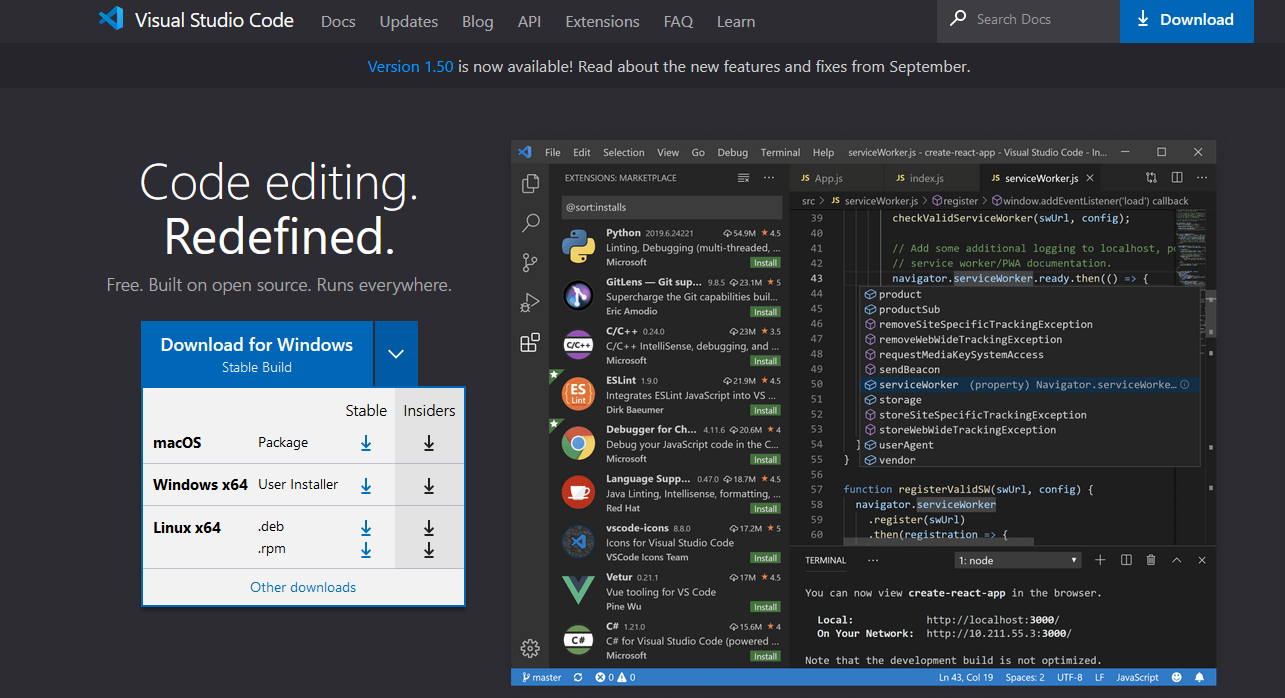
Visit the Visual Studio Code site, click on the download button for your operating system, once downloaded, install it like any other software program; it is easy and straight forward. I use their stable version.
There is detailed documentation on how to get started on it.
Extensions in VS Code
VS Code provides many extensions that help improve code writing efficiency. I have given some of the extensions below to showcase its usefulness.
1. IBM i Languages by barrettotte
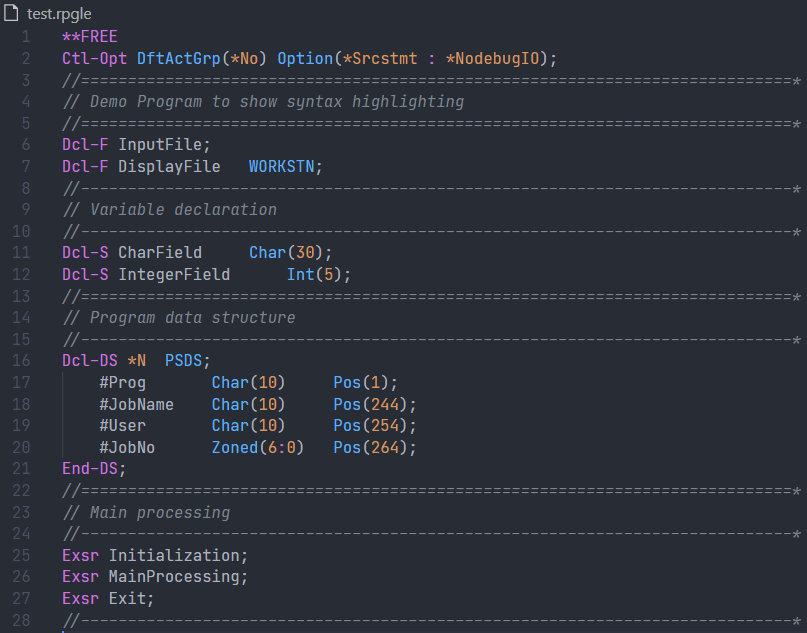
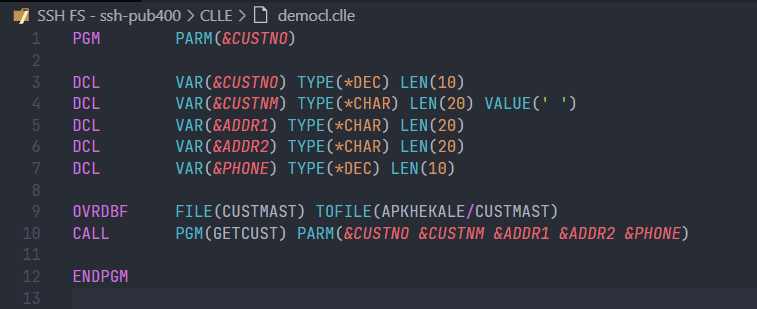
IBM i Languages is an extension for the majority of native languages like RPG, CL, DDS, and RPGLE fixed/free. This extension provides syntax highlighting, keyword prompting, etc. See the snapshots below, where all the opcodes are highlighted.
This is for RPGLE Free.
This is for CLLE.
And one for DDS.
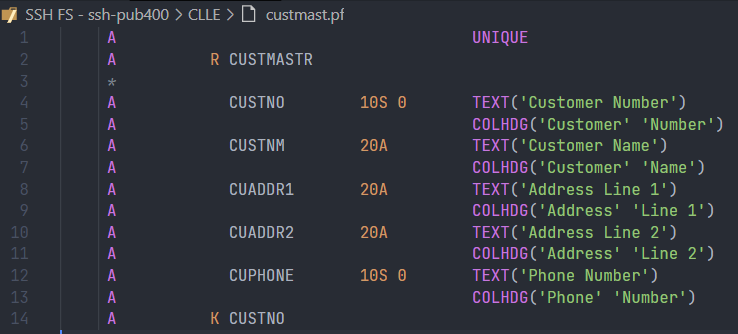
2. IBM Z Open Editor
This COBOL extension is so powerful, with few keystrokes, most of your program gets generated. Let’s see, when I start typing IDENT and hit Enter, the entire IDENTIFICATION DIVISION gets generated using the snippets provided by the extension.
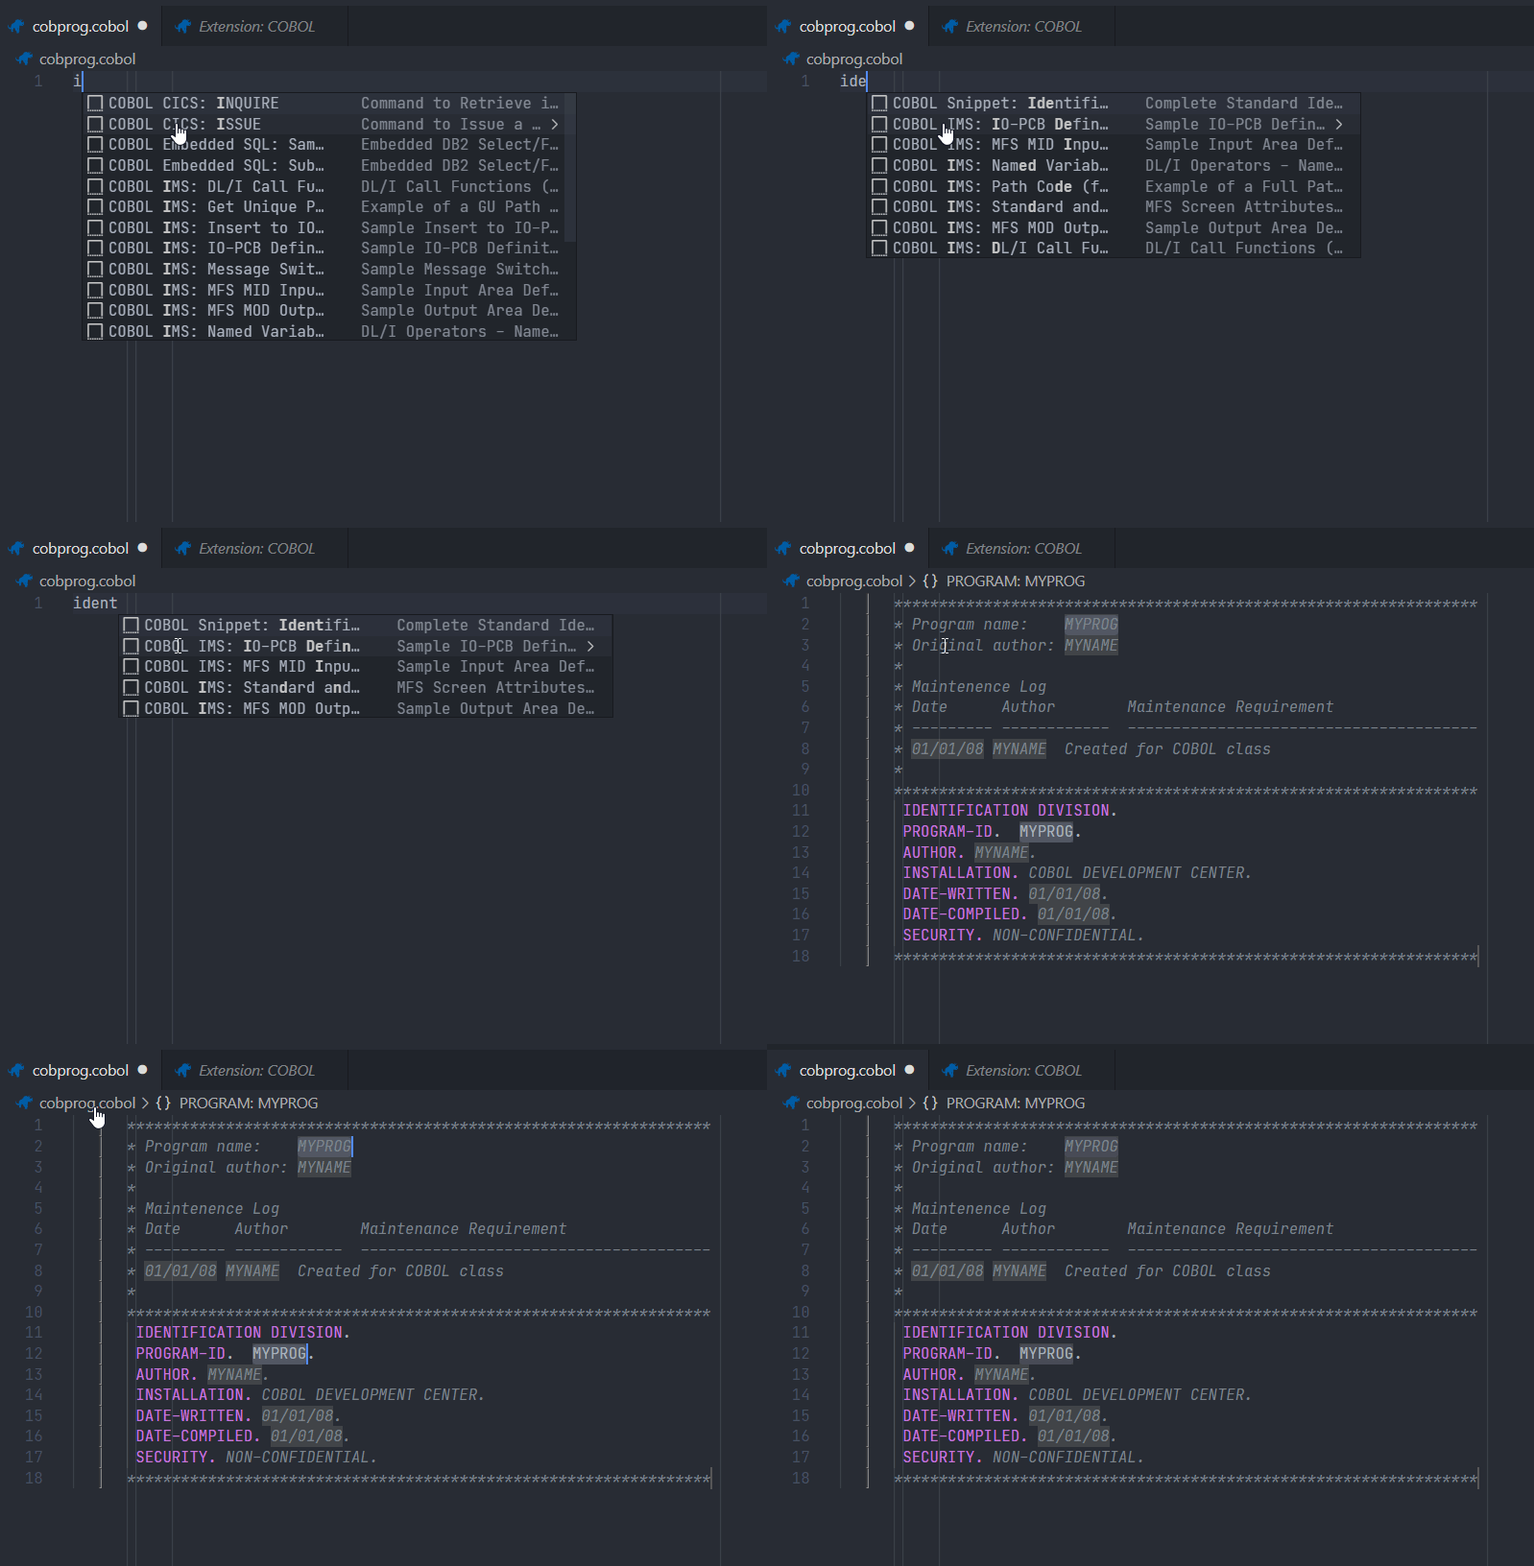
3. Extensions/Themes for Open-source Languages
The below table summarizes some of the extensions/themes I use, which help me a lot when writing a program.
| Extension | Description |
|---|---|
| Bracket Pair Colorizer | A customizable extension for colorizing matching brackets - Link. |
| Code Spell Checker | Spelling checker for source code - Link. |
| Indenticator | Highlights your current indent depth - Link. |
| One Dark Pro Theme | Atom’s iconic One Dark theme for Visual Studio Code - Link. |
| Python | Linting, Debugging (multi-threaded, remote), Intellisense, Jupyter Notebooks, code formatting - Link. |
| SSH FS | File system provider using SSH. - Link. |
| Visual Studio IntelliCode | AI-assisted development. - Link. |
| vscode-icons | Icons for Visual Studio Code. - Link. |
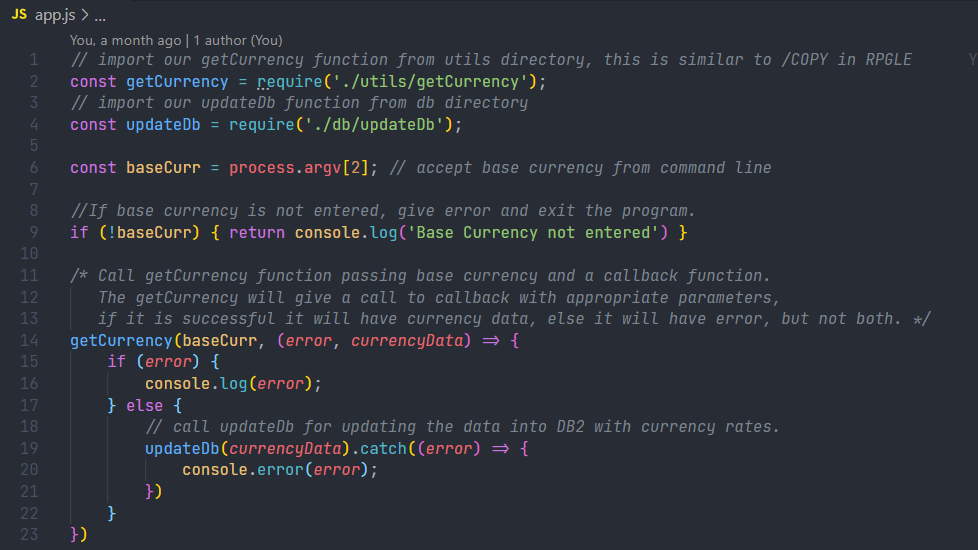
These extensions help syntax highlighting and aid in errorless code. Below is an example of how JavaScript code looks in the VS Code. Beautiful, isn’t it?
How to install Extensions
 Click on the extension symbol as displayed by the image, type the desired extension in the search bar, when the extension appears, click on the install button, and you are done. More information here.
How to write code directly in IFS on IBM i?
It becomes convenient if we don’t have to upload the code often to the IFS directory on IBM i manually. One extension always comes in handy that is SSH-FS, which makes the IFS folder available to us in the VS Code.
How to use SSH-FS
Install the extension, as explained earlier. You should have a basic knowledge of how SSH works. Aaron Bartell has explained it here on IT Jungle, below is a recap.
Make sure that the SSH server is running on IBM i, otherwise, issue the below command from the command line on IBM i.
STRTCPSVR SERVER(*SSHD)
Below are the steps to connect to the IBM i system from Windows Command Prompt. (I am connecting to PUB400.com server with my user-id.)

When prompted, enter your IBM i password.
 You will sign on to IBM i with a shell $ prompt.

After you have tested your SSH connection to the IBM i, configure the SSH-FS in VS Code. Use Ctrl + Shift + P on Windows or Cmd + Shift + P on Mac and type SSHFS in the search bar.
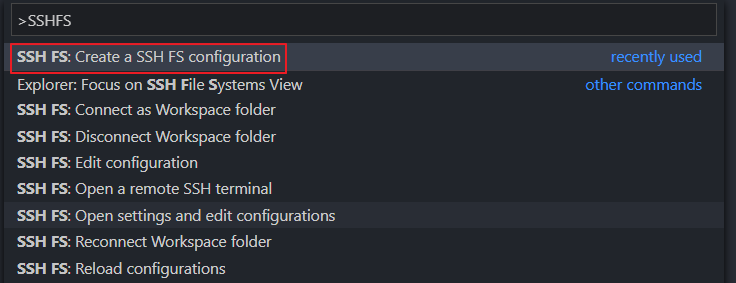
SSH-FS needs the below details, along with the name of the connection.
- The IP/Domain name of your IBM i system
- SSH Port (generally port 22, PUB400 has 2222 port configured for SSH)
- User Id
- Password
- Root folder (/home/USERID)
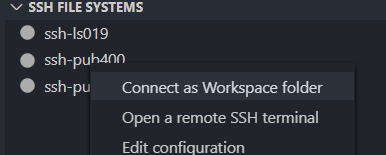 After the configuration is done, under SSH FILE SYSTEMS Section of VS Code sidebar, when we right-click on Connect as Workplace folder, the IFS root folder will be accessible.
We are ready to write our code.
Below is an example of the code written using SSH FS extension, in the IFS.
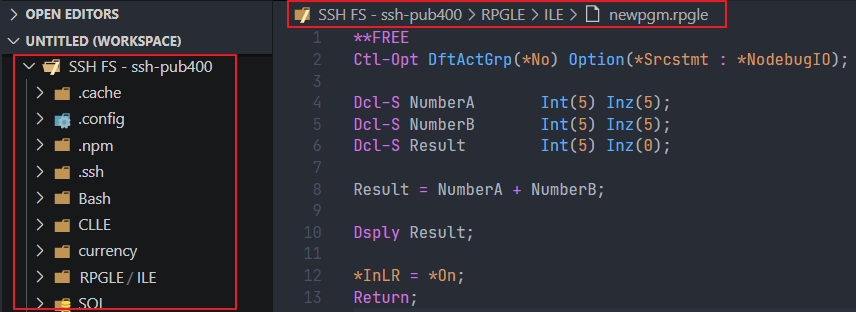
Write Free RPGLE code using SSH-FS
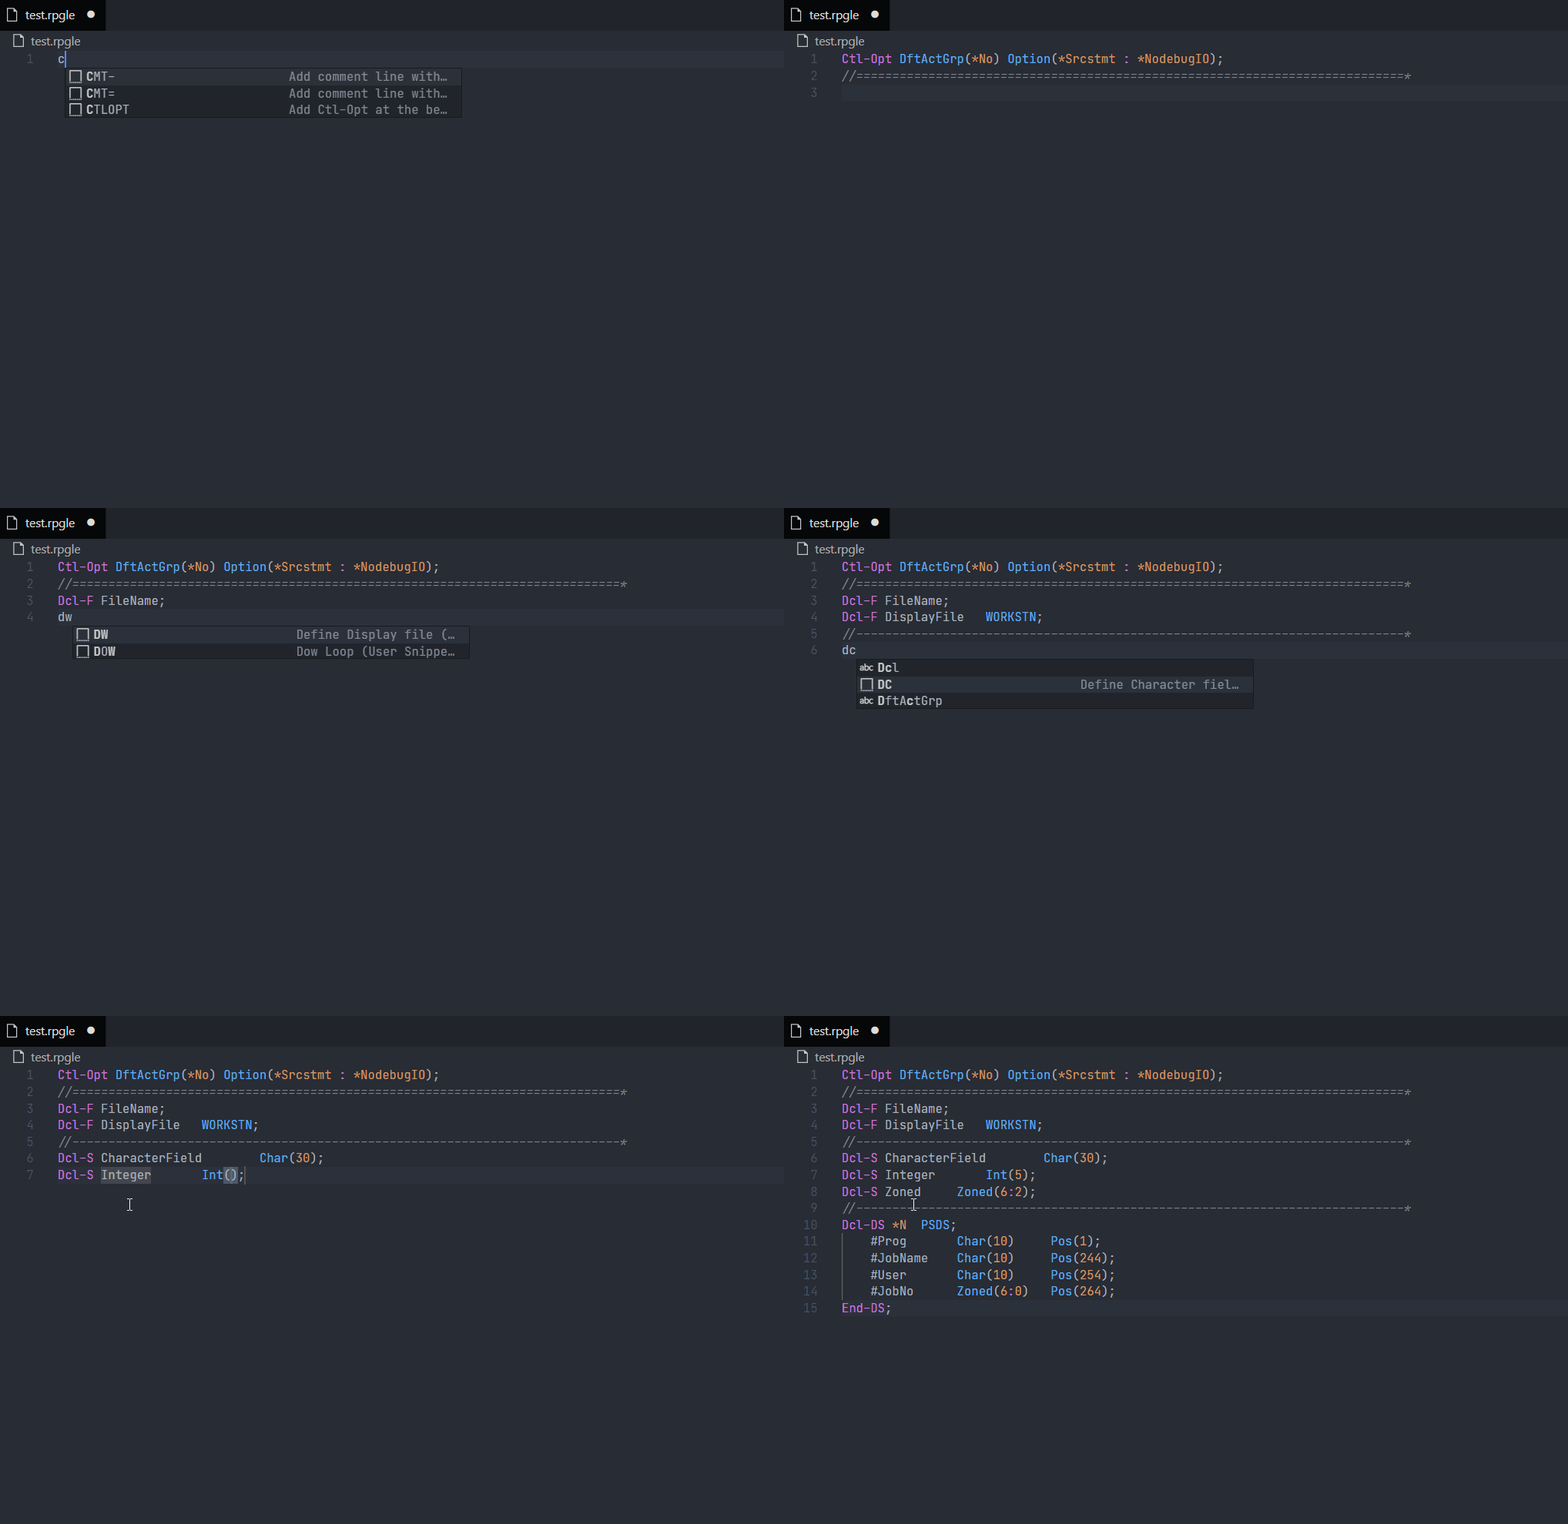
It becomes easy to write free format RPGLE using VS Code due to the extensions discussed earlier. To expedite the writing of code, I have created a snippets file, which is another feature of VS Code editor.
What are Snippets?
VS Code has this feature called Snippets, where we can assign a shortcut to a block of code that we write quite often. We can create our snippet for the language we want to use. We have to create a file in JSON format in File → Preferences →User Snippets.
I have created rpgle.json so that these snippets will be available for a program file with extension .rpgle. You can download and paste the content of the file from here.
Go to File→Preferences→User Snippets
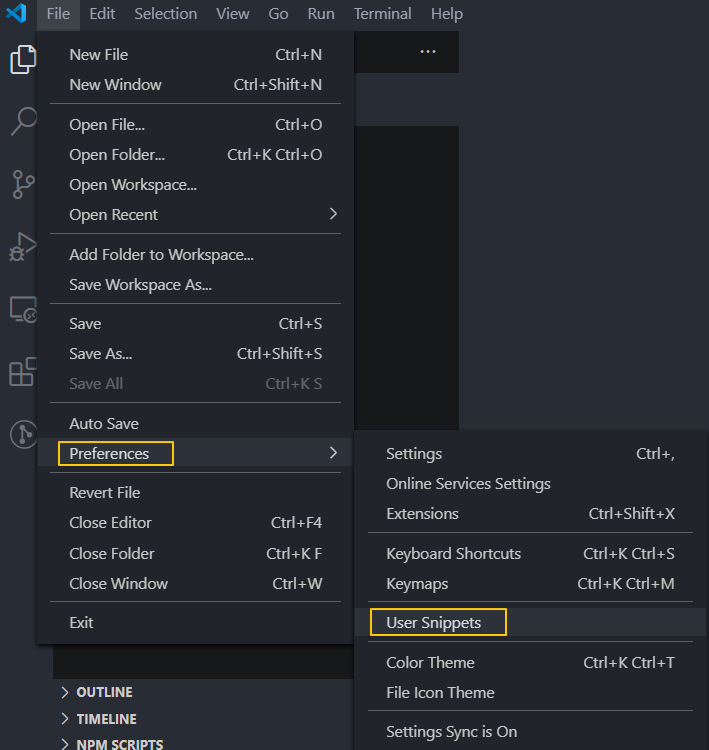
You will be prompted with a search bar, enter rpgle.json.

Paste the content of rpgle.json file as below.
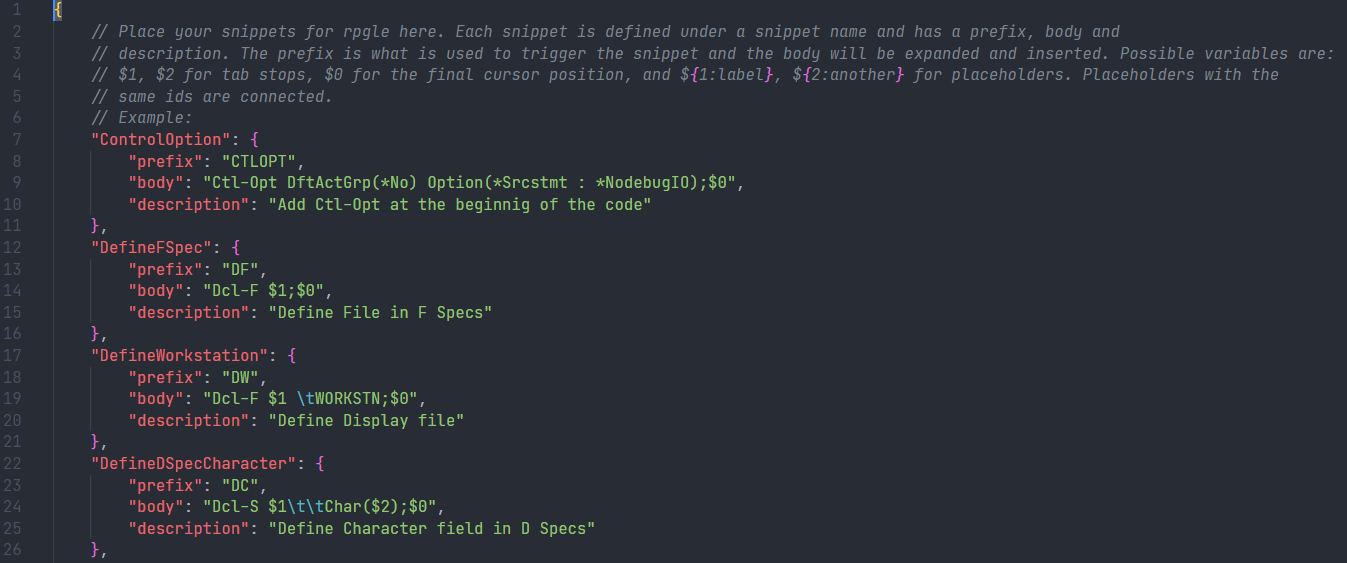
Below is the list of shortcuts to start with and these can be expanded as per our needs. → is used to denote the Tab key.
| Shortcut | Description |
|---|---|
| CTLOPT → | Add Ctl-Opt at the beginning of the code |
| DF → | Define File with DCL-F |
| DW → | Define display file with DCL-F |
| DC → | Define Character Field with DCL-S |
| DV → | Define VARCHAR field |
| DI → | Define Integer field |
| DZ → | Define Zoned field |
| PSDS → | Defind program information datastructure |
| BEGSR → | Create a subroutine |
| CMT= → | Add a comment with //=====// |
| CMT- → | Add a comment with //——-// |
| DOW → | Write a DoW loop |
| DOU → | Write a DoU loop |
| IFENDIF → | Write IF - Endif block |
| IFELSE → | Write IF - ELSE - ENDIF block |
Writing code using RPGLE Snippets
With snippets, it becomes fast and joyful to write code. You just have to use the shortcut and press the Tab key or the Enter key, and the code gets generated for you.
Copying and compiling the IBM i code
When we have completed coding in IFS, it will be better if we automate copying these files to respective source physical files and compile those. It will be a burden if you have to do it manually for each program. Hence, a need for shell script comes in, which I have pasted below.
This shell script will take any file from its current directory with the appropriate extension, let’s say .rpgle, and copy and compile it. For this to run, we have to use our SSH session or QP2TERM (CALL QP2TERM) session on the IBM i.
From the $ prompt, make the file executable for the first time as below.
$ chmod +x buildpgm.sh
And run it with the below command.
$ ./buildpgm.sh
Well, the native IBM i programs can be compiled directly from IFS, but if you have DSPFs, those need source physical file. So for now, I keep everything in respective source physical files.
Below is such a script I have created, which does the job as explained.
#!/QOpenSys/usr/bin/sh
# ------------------------------------------------------------------------- #
# Program       : buildpgm.sh
# Author        : www.anandk.dev
# Date Written  : 27th October 2020
# Inspired from : https://github.com/barrettotte/RPGLE-Twilio/blob/master/build.sh
# ------------------------------------------------------------------------- #
# This program reads current folder from IFS and takes below steps.
# 1. It assumes these sources i.e. dspf, rpgle, sqlrpgle, clle.
# 2. It copies .rpgle, .sqlrpgle, .clle and .dspf to respective _SRC.
# 3. It compiles the DSPF first, then RPGLE, SQLRPGLE and finally CLLE.
# After coping this program to IFS folder where your sources are, use below command
# to make this file executable.
# chmod +x buildpgm.sh
# Set the CUR_LIB to your library.
# Check if the SRCPF names are correct for you.
# Set the application name which will be applied to all the memebers as member text.
# ------------------------------------------------------------------------- #

# Set the IFS directory, if not given, set current
IFS_DIR="${1:-$(pwd)}"

# Set the current library where the programs will be compiled.
CUR_LIB="ANANDK1"

# Set source physical files
DDS_SRC="QDDSSRC"
RPGLE_SRC="QRPGLESRC"
CL_SRC="QCLSRC"

# Set application name
APPLICATION="Weather Application"

# Execute the command by setting the library first
exec_cmd(){
    echo $1
    output=$(qsh -c "liblist -a $CUR_LIB ; system \"$1\"")
    if [ -n "$2" ]; then
    echo -e "$1\n\n$output" > "$IFS_DIR/$2.log"
    fi
}

# Copy DSPF to source PF and compile
crt_dspf(){
  echo -e '\n... executing commands... '
  filename=$(basename "$1")
  member="${filename%.*}"
  exec_cmd "CHGATR OBJ('$1') ATR(*CCSID) VALUE(819)"
  exec_cmd "CPYFRMSTMF FROMSTMF('$1') TOMBR('/QSYS.lib/$CUR_LIB.lib/$DDS_SRC.file/$member.mbr') MBROPT(*REPLACE)"
  exec_cmd "CHGPFM FILE($CUR_LIB/$DDS_SRC) MBR($member) SRCTYPE(DSPF) TEXT('$APPLICATION')"
  exec_cmd "CRTDSPF FILE($CUR_LIB/$member) SRCFILE($CUR_LIB/$DDS_SRC)" $member
}

# Copy RPGLE to SRCPF and compile
crt_rpgle(){
  echo -e '\n... executing commands... '
  filename=$(basename "$1")
  member="${filename%.*}"
  exec_cmd "CHGATR OBJ('$1') ATR(*CCSID) VALUE(819)"
  exec_cmd "CPYFRMSTMF FROMSTMF('$1') TOMBR('/QSYS.lib/$CUR_LIB.lib/$RPGLE_SRC.file/$member.mbr') MBROPT(*REPLACE)"
  exec_cmd "CHGPFM FILE($CUR_LIB/$RPGLE_SRC) MBR($member) SRCTYPE(RPGLE) TEXT('$APPLICATION')"
  exec_cmd "CRTBNDRPG PGM($CUR_LIB/$member) DFTACTGRP(*NO) DBGVIEW(*SOURCE)" $member
}

# Copy SQLRPGLE to SRCPF and compile
crt_sqlrpgle(){
  echo -e '\n... executing commands... '
  filename=$(basename "$1")
  member="${filename%.*}"
  exec_cmd "CHGATR OBJ('$1') ATR(*CCSID) VALUE(819)"
  exec_cmd "CPYFRMSTMF FROMSTMF('$1') TOMBR('/QSYS.lib/$CUR_LIB.lib/$RPGLE_SRC.file/$member.mbr') MBROPT(*REPLACE)"
  exec_cmd "CHGPFM FILE($CUR_LIB/$RPGLE_SRC) MBR($member) SRCTYPE(SQLRPGLE) TEXT('$APPLICATION')"
  exec_cmd "CRTSQLRPGI OBJ($CUR_LIB/$member) SRCFILE($CUR_LIB/$RPGLE_SRC) COMMIT(*NONE) DBGVIEW(*SOURCE)" $member
}

# Copy CLLE to SRCPF and compile
crt_clle(){
echo -e '\n... executing commands... '
  filename=$(basename "$1")
  member="${filename%.*}"
  exec_cmd "CHGATR OBJ('$1') ATR(*CCSID) VALUE(819)"
  exec_cmd "CPYFRMSTMF FROMSTMF('$1') TOMBR('/QSYS.lib/$CUR_LIB.lib/$CL_SRC.file/$member.mbr') MBROPT(*REPLACE)"
  exec_cmd "CHGPFM FILE($CUR_LIB/$CL_SRC) MBR($member) SRCTYPE(CLLE) TEXT('$APPLICATION')"
  exec_cmd "CRTBNDCL PGM($CUR_LIB/$member) SRCFILE($CUR_LIB/$CL_SRC) DFTACTGRP(*NO) ACTGRP(*CALLER) DBGVIEW(*SOURCE)" $member
}

search_dspf(){
    for FILE in "$IFS_DIR"/*
        do
            ext="${FILE##*.}"
            if [[ $ext == 'dspf' ]]; then
                echo -e "\n=========== Building DSPF - $FILE ============="
                crt_dspf $FILE
            fi
        done
}

search_rpgle(){
    for FILE in "$IFS_DIR"/*
        do
            ext="${FILE##*.}"
            if [[ $ext == 'rpgle' ]]; then
                echo -e "\n=========== Building RPGLE - $FILE ============="
                crt_rpgle $FILE
            fi
        done
}

search_sqlrpgle(){
    for FILE in "$IFS_DIR"/*
        do
            ext="${FILE##*.}"
            if [[ $ext == 'sqlrpgle' ]]; then
                echo -e "\n=========== Building SQLRPGLE - $FILE ============="
                crt_sqlrpgle $FILE
            fi
        done
}

search_clle(){
    for FILE in "$IFS_DIR"/*
        do
            ext="${FILE##*.}"
            if [[ $ext == 'clle' ]]; then
                echo -e "\n=========== Building CLLE - $FILE ============="
                crt_clle $FILE
            fi
        done
}

echo -e "|=== Starting to build the programs for $APPLICATION ===|"
search_dspf
search_rpgle
search_sqlrpgle
search_clle
echo -e '|=================================================================================|'
echo -e '| Program build completed, please check if you encountered any errors.            |'
echo -e '| Check the log files created in the below folder.                                |'
echo -e "| $IFS_DIR                                                            |"
echo -e '|=================================================================================|'
Synchronizing your set up
It is necessary that, when you have completed all your customization for VS Code, you should sync your setup so that, if you change your laptop/desktop, those are retained and you don’t have to do it all over again.
When you go to File → Preferences →Setting Sync you can configure where you want to sync it. I have currently set it to sync with my GitHub account.

Wrapping up…
I find the VS Code editor highly customizable and efficient to use while I work on IBM i. It is also available on all operating systems.
I hope this article has given you some ideas on how to use the editor.
As always, request you to get in touch with me on LinkedIn/Twitter or email with your valuable feedback. Thanks for reading!
