How to generate PDFs using Python on IBM i
 In this article, let’s see how we can use Python on the IBM i to generate well-formatted PDFs. The advantage of using Python for this is, it provides various packages so that the formatting, placement of the tables, etc. are handled easily; we will be using one of such packages.
I have assumed a basic knowledge of Python, but have given enough details for the beginners. Let’s see how we can start using Python on the IBM i.
Note: The code for this utility can be downloaded from here.
Check Python on IBM i
Check if your IBM i has Python installed in the open-source software by using the below command in CALL QP2TERM session (or SSH session). We will check the version of Python as well.
$ which python3
/QOpenSys/pkgs/bin/python3
$ python3 --version
Python 3.6.12
Once we are sure we have Python 3 available on the system, we are all set to work on this utility.
Create a working Directory
For this utility, let’s start with creating a directory and working from that directory.
$ mkdir ibmi-pdf
$ cd ibmi-pdf
Python Virtual Environments
Before we start installing the necessary libraries needed for our task, let’s first introduce ourselves to the virtual environment in Python.
Python comes with standard packages. It also provides third-party packages that we need to install before we can use those. By creating a virtual environment, we are scoping the use of those third-party libraries just for our use-case without affecting the standard packages and their versions. It gives more advantage to work independently and help keep the package version intact just for our case.
Many times on the IBM i, we may not have permission to install the package globally, so it is a good practice to create a virtual environment and install the package in it. A virtual environment is a self-contained directory tree that contains a Python installation for a particular version of Python, plus several additional packages.
How to create Virtual Environment
A virtual environment can be created as shown below; it will create one named venv1 . (You may provide any name to the environment.)
$ python3 -m venv --system-site-packages venv1
After the completion of the above command, a folder by the name venv1 will be created in our directory ibmi-pdf.
Once the virtual environment is created, we have to activate it by using the below command.
$ . venv1/bin/activate
venv1 $
Our $ prompt will change with the name of the virtual environment after this step. It means that the virtual environment is now active.
Installing the packages
Now that our virtual environment is ready, it’s time to install a specific package for PDF generation, which is FPDF.
We will be installing the package using a Python package installer known as pip. This installer searches the package in the Python Package Index and downloads all the dependencies for us.
We will install it by issuing the below command.
venv1 $ pip3 install fpdf
Now that the package is installed, let’s start working on the code to generate PDFs.
Fetch Data from DB2 using ibm_db_dbi
We will be fetching the data from DB2 using IBM-provided Python package ibm_db_dbi . This package is available by default, there is no need to install it. The below code demonstrates how it fetches the data. We are using the demo file provided by IBM, i.e. QIWS/QCUSTCDT
import ibm_db_dbi as db2 #Import the package
conn= db2.connect() # Make a connection
cur = conn.cursor()
cur.execute("SELECT CUSNUM, LSTNAM, BALDUE, CDTLMT FROM QIWS.QCUSTCDT")
# CursorByName will provide data in Key:Value pair, which we will use while generating
# the PDF
class CursorByName():
    def __init__(self, cursor):
        self._cursor = cursor

    def __iter__(self):
        return self

    def __next__(self):
        row = self._cursor.__next__()

        return {description[0]: row[col] for col, description in enumerate(self._cursor.description)}

data=[]
for row in CursorByName(cur):
    data.append(row) #Get data from the cursor and store it in an array
Add PDF Processing
Using the above code, we can fetch the data from the DB2 table. Now we will see how we can add it in a well-formatted table in a PDF document. As discussed earlier, we will be importing the FPDF package for it. See the code below for PDF processing.
from fpdf import FPDF
pdf = FPDF()
pdf.add_page()
pdf.set_left_margin(margin=40)
pdf.set_font('Arial', 'B', 12)
pdf.set_fill_color(193,229,252)

#Set the table headers
fill_color = 1
pdf.cell(w=40, h=10, txt='Customer Number', border=1, ln=0, align='L', fill=fill_color)
pdf.cell(w=30, h=10, txt='Last Name', border=1, ln=0, align='L', fill=fill_color)
pdf.cell(w=30, h=10, txt='Balance Due', border=1, ln=0, align='L', fill=fill_color)
pdf.cell(w=30, h=10, txt='Credit Limit', border=1, ln=1, align='L', fill=fill_color)

# Style set up for rows
pdf.set_font('Arial', '', 12)
pdf.set_fill_color(235,236,236)

# Process the database rows to print to the PDF
fill_color = 0
for row in data:
    cus_num = str(row['CUSNUM'])
    lst_nam = row['LSTNAM']
    bal_due = str(row['BALDUE'])
    cdt_lmt = str(row['CDTLMT'])

    pdf.cell(w=40, h=8, txt=cus_num, border=1, ln=0, align='L', fill=fill_color)
    pdf.cell(w=30, h=8, txt=lst_nam, border=1, ln=0, align='L', fill=fill_color)
    pdf.cell(w=30, h=8, txt=bal_due, border=1, ln=0, align='R', fill=fill_color)
    pdf.cell(w=30, h=8, txt=cdt_lmt, border=1, ln=1, align='R', fill=fill_color)

    # Flip the fill color for alternate row.
    if (fill_color==0):
        fill_color=1
    else:
        fill_color=0

# Output the PDF file
pdf.output('customer.pdf','F')
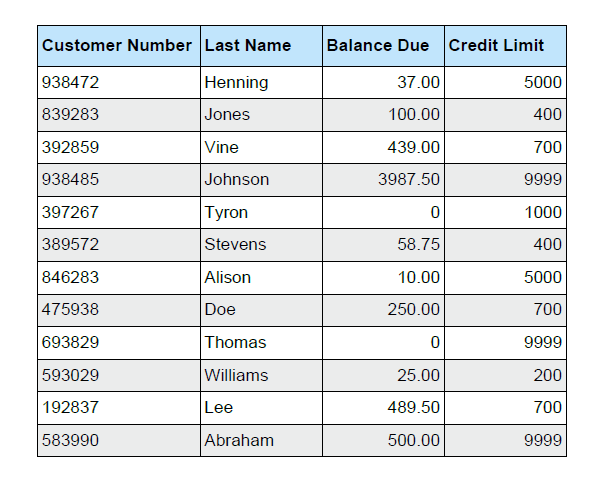
Acustomer.pdf file is generated as displayed below.

Now add more formatting to the PDF; add header and footer. Add the following code to get the desired effect.
## Add Header and Footer to the page
class PDF(FPDF):
    def header(self):
        # Logo
        self.image('ibmi.png', 10, 8, 20)
        # Arial bold 15
        self.set_font('Arial', 'B', 15)
        # Move to the right
        self.cell(80)
        # Title
        self.cell(30, 10, 'Customer balance due report  ', 0, 0, 'C')
        # Line break
        self.ln(40)
        # Add dashed line
        self.dashed_line(10, 50, 200, 50, 1, 1)
        # Add line break after the dashed line
        self.ln(20)

    # Page footer
    def footer(self):
        # Position at 1.5 cm from bottom
        self.set_y(-15)
        # Arial italic 8
        self.set_font('Arial', 'I', 8)
        # Page number
        self.cell(0, 10, 'Page ' + str(self.page_no()), 0, 0, 'C')
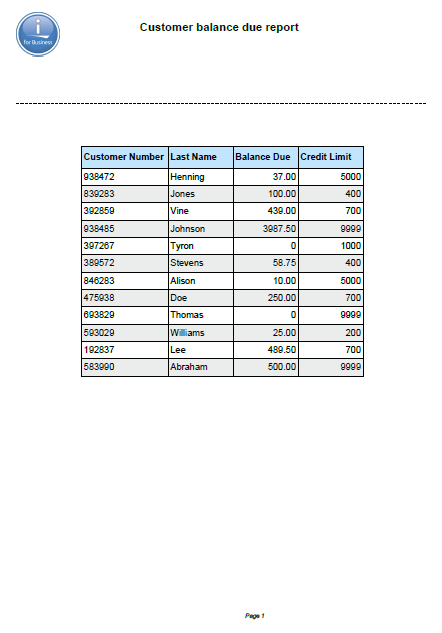
With this, our PDF generation is complete. We get the final file as below, with the company logo, title, and footer. We can customize it any way we want. For simplicity, I am stopping here.

The final code for the utility is as below.
from fpdf import FPDF
import ibm_db_dbi as db2 #Import the package

# Fetch data from the database
conn= db2.connect() # Make a connection
cur = conn.cursor()
cur.execute("SELECT CUSNUM, LSTNAM, BALDUE, CDTLMT FROM QIWS.QCUSTCDT")

# CursorByName will provide data in Key:Value pair, which we will use while generating
# the PDF
class CursorByName():
    def __init__(self, cursor):
        self._cursor = cursor

    def __iter__(self):
        return self

    def __next__(self):
        row = self._cursor.__next__()

        return {description[0]: row[col] for col, description in enumerate(self._cursor.description)}

data=[]
for row in CursorByName(cur):
    data.append(row)

## PDF Processing

## Add Header and Footer to the page
class PDF(FPDF):
    def header(self):
        # Logo
        self.image('ibmi.png', 10, 8, 20)
        # Arial bold 15
        self.set_font('Arial', 'B', 15)
        # Move to the right
        self.cell(80)
        # Title
        self.cell(30, 10, 'Customer balance due report  ', 0, 0, 'C')
        # Line break
        self.ln(40)
        # Add dashed line
        self.dashed_line(10, 50, 200, 50, 1, 1)
        # Add line break after the dashed line
        self.ln(20)

    # Page footer
    def footer(self):
        # Position at 1.5 cm from bottom
        self.set_y(-15)
        # Arial italic 8
        self.set_font('Arial', 'I', 8)
        # Page number
        self.cell(0, 10, 'Page ' + str(self.page_no()), 0, 0, 'C')

# Instatiate the PDF class and add page with attributes
pdf = PDF()
pdf.add_page()
pdf.set_left_margin(margin=40)
pdf.set_font('Arial', 'B', 12)
pdf.set_fill_color(193,229,252)

#Set the table headers, with background fill color
fill_color = 1
pdf.cell(w=40, h=10, txt='Customer Number', border=1, ln=0, align='L', fill=fill_color)
pdf.cell(w=30, h=10, txt='Last Name', border=1, ln=0, align='L', fill=fill_color)
pdf.cell(w=30, h=10, txt='Balance Due', border=1, ln=0, align='L', fill=fill_color)
pdf.cell(w=30, h=10, txt='Credit Limit', border=1, ln=1, align='L', fill=fill_color)

# Style set up for rows
pdf.set_font('Arial', '', 12)
pdf.set_fill_color(235,236,236)

# Process the database rows to print to the PDF
fill_color = 0
for row in data:
    # Get data from each row of the table
    cus_num = str(row['CUSNUM'])
    lst_nam = row['LSTNAM']
    bal_due = str(row['BALDUE'])
    cdt_lmt = str(row['CDTLMT'])

    # Create cells with the data and print it on PDF
    pdf.cell(w=40, h=8, txt=cus_num, border=1, ln=0, align='L', fill=fill_color)
    pdf.cell(w=30, h=8, txt=lst_nam, border=1, ln=0, align='L', fill=fill_color)
    pdf.cell(w=30, h=8, txt=bal_due, border=1, ln=0, align='R', fill=fill_color)
    pdf.cell(w=30, h=8, txt=cdt_lmt, border=1, ln=1, align='R', fill=fill_color)

    # Flip the fill color for alternate row.
    if (fill_color==0):
        fill_color=1
    else:
        fill_color=0

# Output the PDF file
pdf.output('customer.pdf','F')
Deactivate the virtual environment
Once we are done running our utility, we can deactivate the virtual environment by issuing the below command from the same session. This puts us back to use the system’s default Python interpreter with all its installed libraries.
$ deactivate
How to install and run the utility
- Download the utility folder from here.
- In IFS create directory
ibmi-pdf. - Upload the content of the folder in IFS in directory
ibmi-pdf - Login to SSH or CALL QP2TERM session.
- Change the current directory to
ibmi-pdfusingcd ibmi-pdf. - Create virtual environment using
python3 -m venv --system-site-packages venv1. (This will take some time, and is a one-time activity.) - Activate the virtual environment by using
. venv1/bin/activate. - Install the FPDF package using
pip3 install fpdf. - Run the utility by using
python3 genpdf.py. - You should have
customer.pdffile ready upon successful run of the utility. - Deactivate the virtual environment using
deactivate.
Special Thanks
- PUB400.COM - Such a fantastic server to try out new things on the IBM i.
- Papaya.io - Web-based image editing tool, very easy and fast to edit images.
Conclusion
We have seen the power of Node.js in my earlier articles. Similarly, Python can be used to our advantage to produce PDFs, generating charts, and doing data analytics on the IBM i. I hope this article provided an introduction to how to generate PDFs using Python on the IBM i.
As always, request you to get in touch with me on LinkedIn/Twitter or email with your valuable feedback. Thanks for reading!
